
Navigating the WordPress Dashboard
After logging in to your website, you’ll be taken to your WordPress Dashboard. From here, you’ll be able to perform all the necessary editing functions. The following image shows what you’ll see on your Dashboard with each aspect labeled and described below.
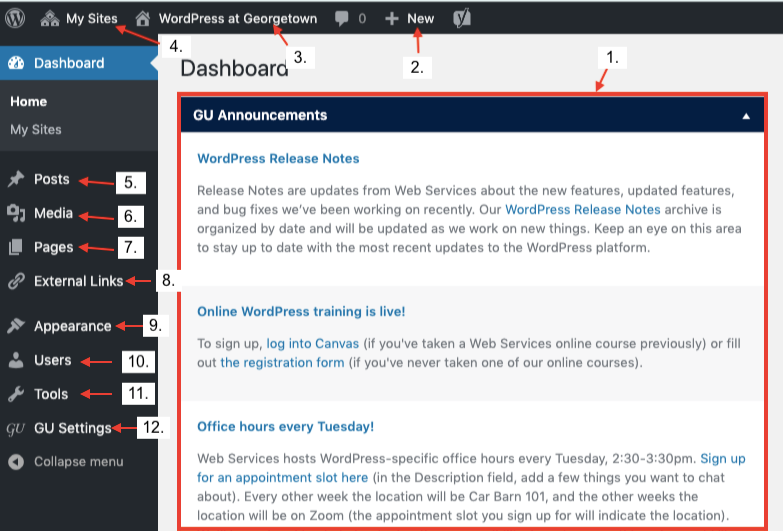
- GU Announcements. This text box is maintained by Web Services and includes some helpful links that are relevant for website editors.
- Add New shortcut. This quick dropdown option from which you can add a post, media, page, external link, or user.
- Site title. The site title is displayed at the top of the admin bar. While on the dashboard or viewing the editor, clicking the title will take you to the front-end of the website. While on the front-end of the website, clicking this option will take you to the dashboard.
- My Sites. Hovering over this option provides a dropdown of all the GU WordPress sites you have access to, which allows you to easily navigate back and forth between them.
- Posts. From this option, you can view all posts, add a new post or manage your categories and tags.
- Media. You can view all images and media, edit images, as well as add new images.
- Pages. From here, you can view all pages or add a new page.
- External Links. From here, you can view and add external links.
- Appearance. Under this option, you can view and edit the menus on your site.
- Users. Site managers can view, edit, add, and remove users from their site here. All other user roles will not see this option in the dashboard.
- Tools. This option is empty for GU WordPress site users as only Web Services has access to these options.
- GU Settings. These are site-specific settings that can be altered, including editing the footer.